I like to challenge myself every year, hoping they'll be better and better.
Latest one; 2016:


I tried to do a dragon this year. It was quite a bit of work and not totally the shape I wanted, but I was restricted by the shape of the pumpkin.
--------------------------------------------------------------------------
The first non-face-pumpkin was a haunted house and the year after something with a witch. There are no pictures of those (or maybe they are somewhere, but I don't have them). These were just basic cut out patterns, no play of colors what so ever. |
| A tiger face when the pumpkin wasn't lit. |
 |
| The lit version. The red you see is the candle inside. |
With some help from internet I learned there were at least 3 colors to be achieved when you carve:
- Black- Leave the skin.
- Dark orange: Carve only the skin away.
- Light orange: Carve all (flesh and skin)
There's another method where they carve the flesh out (leaving the skin) to create another darker tone of orange, but I haven't tried that yet.
For Halloween 2009 I chose a wolf pattern:
 |
| Unlit wolf pattern pumpkin |
 |
| Lit wolf pattern pumpkin |
Therefor I made a Gizmo from the Gremlins one:
 |
| Unlit Gizmo pumpkin |
 |
| Lit Gizmo pumpkin |
In the year 2010 I wanted something more difficult so I chose an owl.
 |
| Unlit owl |
 |
| Lit owl |
The owl was quite a bit of work, it's wing spreads across most of the side of the pumpkin. And due to all the white/ light colors in the picture I had to remove quite a bit, but leaving enough to keep the feather pattern standing.
In 2011 I had to make one in a short amount of time, since I was carving together with someone else who did it for the first time, therefor needing a lot of assistance.
I did Remy the Rat from the movie Ratatouille.
 |
| The pictures of Remy seem to be missing. This is the only one I could find. |

One of my old techniques were to make a printed copy and use some tracing paper to put the lines on the pumpkin. This didn't always work that well, because the ink of the paper wouldn't always transfer on the pumpkin. Instead I drew it directly on the pumpkin with a marker.
Normally I'd also use a small Stanley knife. But because of all the small parts I used a precision knife to be able to carve the woolly pattern out.
It took me several hours to carve. The Halloween party had already ended before I had finished.


Something completely different but still Halloween pumpkin related:
For this I used the techniques described by:
Stolloween Pumpkins
Check out their website; they have plenty of Halloween ideas you can make with paper mache.
 |
| Sackboy from Little Big Planet. My camera had crashed shortly after Halloween. Luckily this picture was already put on my computer. |
Okay, so the wool pattern might not be as perfect as I'd liked it to be, but non the less it looks pretty awesome if I may say it myself.
2013 I apparently skipped a year.
In 2014 I went back to another elaborate/ crazy carving idea that took me hours to complete: This victorian pattern:


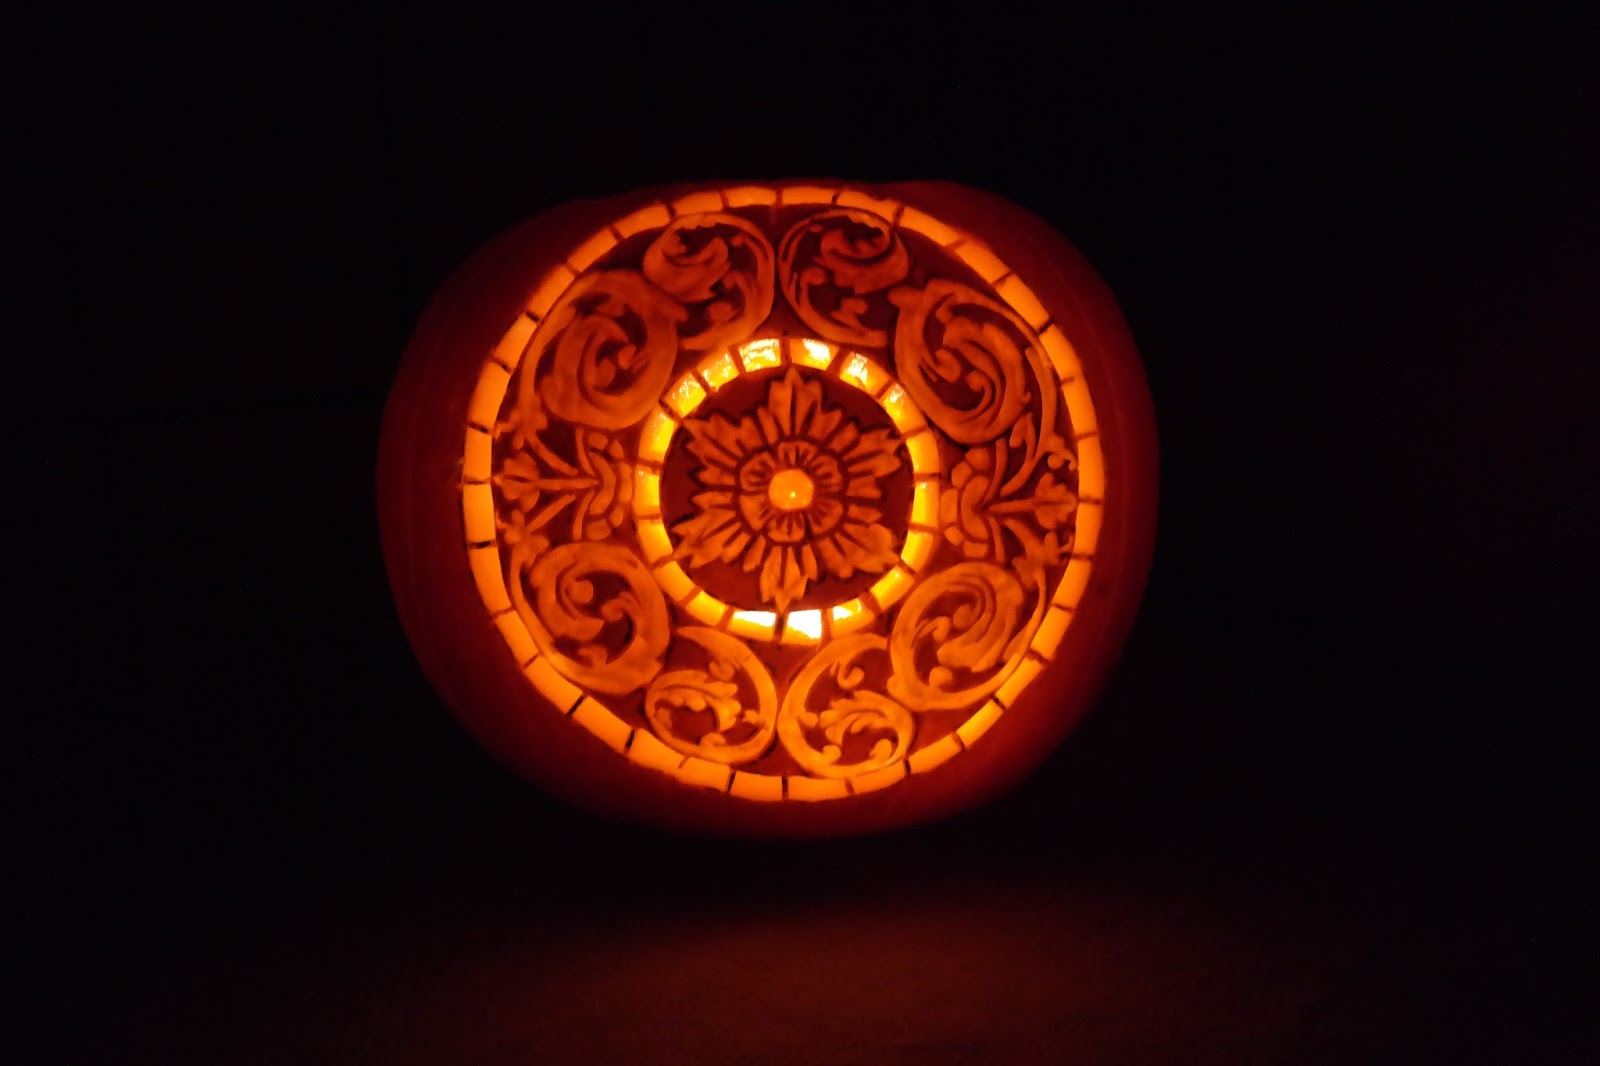 |
| Not perfectly symmetric, but could be worse. |
In 2015 I gave it my first attempt to do a 3D carving. This is a technique where you carve out a complete face from the pumpkin flesh, instead of carving all the way through.
This one doesn't have a top that comes off, therefor I couldn't put a candle inside. None the less it had some great decorational value.


 |
| My first attempt to do a 3D carving. Gollum turned out a bit too Smeagol for my liking (too friendly) ;) |
Something completely different but still Halloween pumpkin related:
My paper mache Halloween pumpkin.
 |
| Pumpkin made from newspaper shreds and some carton. |
Stolloween Pumpkins
Check out their website; they have plenty of Halloween ideas you can make with paper mache.
No comments:
Post a Comment